 |
 |
 |
 |
 |
 |
|
 |
 |
 |
 |
 |
||
roofkey Roofing Guidelines
Revised - This Web Page Updated January 12, 2014
The roofkey Roofing Guidelines are here to help
both the
Property Owner and
Roofing Contractor have a good quality roof installation. Passing
our roof inspections greatly reduces the chance of roof leaks,
other roofing problems, callbacks
and litigations.
We perform Roof Covering and/or above the roof slopes Exterior Wall Covering Inspections to determine if the roof covering and/or exterior wall covering materials and accessories are installed in a workmanship like manner following generally accepted roof covering and/or exterior wall covering standards that not only meet the local City�s/County�s current IBC and IRC Building Codes and their amendments but also the 2012 IBC and IRC Building Codes as well as current ICC Evaluation Services Reports, Roof Covering and/or Exterior Wall Covering Manufacturer�s Association Installation Manuals, and Manufacturer�s Specifications, whichever is more restrictive.
Building Codes and Manufacturer's specifications can sometimes be conflicting and can vary from one area to another. See Building Code Conflicts web page.
Each of the roofkey Roofing Guidelines listed below is recognized by one or more City/County Building Departments, however, which roofing guidelines they each recognize varies. Most all recognize at least 80 percent or more and a some almost 100 percent.
Just because your roof is located in one area does not mean it should be roofed to a lower standard, thereby increasing the chance of developing roof leaks, or other roofing problems, callbacks and possible litigation.
Many Roofing Contractors will bid the roof to the local building code only, just to get the job. They fail to let the property owner know of the many other choices there are to greatly reduce the chance of problems occurring. The roofkey Roofing Guidelines below provide property owners with information so they can make the decisions, not the Roofing Contractor, on how they want their roof installed.
The roofkey Roofing Guidelines below are based upon the weather conditions that occur in Colorado that affect and dictate the use of roofing materials and their installation. These weather conditions are known as the Minimum Building Design Criteria or in this case the Minimum Design Criteria for Roofing.
roofkey Minimum Building Design Criteria for Roofing
in the State of Colorado
Local City/County Building Design Criteria for Roofing will be used if more restrictive than what is listed below. Example might be as you move west and up in elevation the wind speed and the ground snow load criteria increases.
-
100 mph 3-second gust wind speed or 85 mph fastest mile wind speed
-
The Minimum mph 3 second gust wind speed criteria increases the further west toward and into the mountains west of Denver the structure is located. We utilize, which most City/County Building Departments also use, the general guidelines published in the 2006 Colorado Front Range Gust Map document prepared by Jon A. Peterka of Cermak Peterka Peterson, Inc. but starting with the 110 mph 3-second wind gust contour listed on their maps and going west only from there. We and many City/County Building Departments consider the rest of the Metro Denver Area east of the 110 mph contour to be a Minimum of a 100 mph 3-second gust wind speed zone.
-
-
30 pounds per square foot ground/roof snow load
-
The Minimum 30 pounds per square foot ground/roof snow load criteria increases the further west toward and into the mountains west of Denver the structure is located by 5 pounds per square foot for every 500 feet rise in elevation. We generally follow Snow Load Tables similar to the one Douglas County Colorado uses of Up to 5999 feet in elevation = 30 lbs./sq. ft. of snow load; 6000 - 6499 feet in elevation = 35 lbs./sq. ft. of snow load; 6500 - 6999 feet in elevation = 40 lbs./sq. ft. of snow load; 7000 - 7499 feet in elevation = 45 lbs./sq. ft. of snow load; 7500 - 7999 feet in elevation = 50 lbs./sq. ft. of snow load; 8000 - 8499 feet in elevation = 55 lbs./sq. ft. of snow load, etc.
-
-
Wind Driven Snow Area
-
All of Colorado including the Metro Denver Area frequently receives wind driven snow according to the NOAA's National Weather Service issuing everything from Winter Storm Advisories and Warnings to Blowing Snow Advisories every year to Blizzard Warnings in some years.
-
-
Ice Damming at eaves
-
All of Colorado including the Metro Denver Area has Ice forming along the eaves every winter to some extent with as much as 8" to 12" or more of Ice Damming occurring every 5 to 10 years. Many times this Ice Damming results in damage to the structure and many insurance claims. Both the 2009 IRC and IBC require the use of an Ice and Water Membrane "In areas where there has been a history of Ice forming along the eaves causing a backup of water an Ice Barrier that consists of.....shall be used in lieu of normal underlayment and extend from....." Plus most Roof Covering Manufacturers at least recommend the use of an Ice and Water Membrane if they don't come right out and state it.
-
-
3.0 inches per hour for 100-Year, 1-Hour Rainfall (for roof drain sizing)
-
Moderate or Severe Hail Exposure Area
-
We utilize the 2012 IRC Hail Exposure Map Figure R903.5 for all structures whether they are classified as an IRC or an IBC Structure. If the hail stones are large enough to do damage to the roof of a single family house built under the IRC Code, the same hail stones will damage the same type of roof covering on the commercial building built under the IBC Code next door.
-
roofkey Roofing Guidelines
The roofkey Roofing Guidelines listed below address only some of the roofing materials and/or circumstances that occur with roofing installations. Failure to follow these roofkey Roofing Guidelines or any other requirements not listed here will result in a correction being written in our Roof Inspection Service Report.
Below are some of the more restrictive requirements taken from the above described Codes, Amendments, Specifications, Manuals, and other Industry Standards that are based upon the weather conditions as listed in the roofkey Minimum Design Criteria. These weather conditions do affect and dictate the use of roofing materials and their installation.
Property Owners should be properly informed of everything that is listed here in our roofkey Roofing Guidelines web page. Property Owners should also be informed of the risks involved if they should choose to Opt Out of any of our roofkey Roofing Guidelines that are not required by their local City/County Building Department. If the Property Owner does elect to Opt Out of any of the roofkey Roofing Guidelines, we will write a Conditional PASS Final Roof Inspection Report. Our Conditional PASS Final Roof Inspection Report will list any items from our roofkey Roofing Guidelines that were Opted Out of by the Property Owners but will contain the words "However this roof PASSES our Final Roof Inspection because we understand that the Property Owners have Opted Out of the above listed roofkey Roofing Guidelines and/or Corrections/Observations."
Again, Property Owners may Opt Out of some of the roofkey Roofing Guidelines listed below at their own risk that are not required by their Local Building Department. However, if you, the Property Owner, incur damage as a result of your choice to opt out of any of the roofkey Roofing Guidelines remember it is at your own risk, not the Roofing Contractor's responsibility to fix it.
We highly recommend that you, the Property Owner, do not Opt Out of any of the roofkey Roofing Guidelines even if one or more are not recognized or enforced by your Local Building Department. City/County Building Departments can and do make mistakes causing litigation between Property Owners or litigation between the Roofing Contractor and the Property Owner.
roofkey Roofing Guidelines General for all Sloped Roof Coverings
- Existing Roof Coverings: Removal of All Roof
Coverings down to the Roof Decking including Underlayment is required.
- Deteriorated Decking: The decking must be removed where the decking is
water soaked or deteriorated. Additional decking will be required if the
existing decking will not provide a sound, level, and rigid surface.
Example: Old 3/8 inch decking will need to be overlaid with new code approved
decking material.
- Underlayment: All underlayments are required to be labeled with the
appropriate ASTM numbers. If using ICC-ES approved "Alternate"
Underlayments they must be applied in the same fashion as the Standard
Underlayment they are an Alternate for. If 2 plies of Standard
Underlayment are required the 2 plies of the "Alternate" Underlayment is
required.
- Ice and Water Membrane: An Underlayment of an
ASTM D 1970 Ice and Water Membrane (self adhering polymer modified bitumen
sheet) or
equal is required at ALL eaves of sloped roofs applied directly to the
decking and up the roof slope two (2) feet past the exterior wall line.
As the elevation of the location of the structure increases so does the
application of the Ice and Water Membrane extend up the roof slope from the
eave. In
the case of a patio cover that has a minimum of three (3) open sides, an Ice
and Water Membrane is only necessary three (3) feet up the roof from the
eave. Exception: Detached accessory structures that contain no conditioned
floor area do not require an ice and water membrane.
- The Property Owner could Opt Out of this guideline if not required
by their Local Building Department as long as they understand that there
is an increased risk of damage to their structure from moisture getting
in due to Ice Damming that may not be covered by their Property Owner's
Insurance Company.
- Metal Drip Edge: A metal drip edge is required at the eaves of all
roofs.
- Fastener Heads: Fasteners shall be flush with the roofing material's
surface, NOT over driven, under driven, or crooked for all roofing
materials.
- Fasteners: IRC/IBC approved Corrosion Resistant
Fasteners are required with the installation of all roofing materials and
accessories including battens.
- Weather Exposure: Maximum weather exposure shall not be exceeded.
Check manufacturer's specifications before installation. When a staggered
installation is performed, the coursing of all roofing materials must be
dropped so that the distance between the butt of the lowest roofing material
in one course and the highest butt in the course above does not exceed the
maximum weather exposure allowed.
- Flashing: All rusted, damaged, or
deteriorated roof flashing, vent flashing, metal edging, drain outlets,
collars, and metal counter flashing must be replaced.
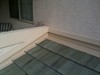
- Exterior Wall Coverings: Siding, Stucco, Brick or
Stone veneer and any other type of exterior wall covering must be kept up
off the roof surface a minimum of 1 1/2" for Steep-Sloped Roofing and 12"
for Flat Roofing at all rake walls, head walls, parapet walls and chimneys.
Exterior wall coverings of any type cannot be setting down on the surface of
the roofing material. Check with the manufacturer of the exterior wall
covering because some, such as James Hardie
http://www.jameshardie.com/d2w/best-practices/quick-start-hz5-us-en.pdf, require their
fiber cement siding to be a minimum of 2" above the surface of the roof in
areas with elevations above 4000 feet.
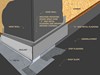
- Through the Wall (Z Bar) Flashing and Vertical Blocking: (See
our web page
Roof to
Wall Intersections for more information, photos, and drawings.) A
Through the Wall (Z Bar) Flashing and in most cases a Vertical
Blocking/Backing piece of lumber are to be used at all Rake Walls, Head
Walls, Parapet Walls, and Chimneys for the termination edge of all exterior
wall coverings.
- If the Though the Wall (Z Bar) Flashing has not been previously
installed: cut the existing exterior wall covering up
off the roof deck far enough to allow for the proper installation of the
new Through the Wall (Z Bar) Flashing to be installed up behind the
existing Water-Resistive Barrier (House Wrap), if there is any, without
damaging the existing Water-Resistive Barrier (House Wrap). Cuts
must be made straight.
- Vertical Blocking/Backing Lumber: is required to be
near the thickness of the exterior wall covering but not thicker. For
example, a nominal 1" x 6" piece of Lumber is actually 3/4" and would be
used where the exterior wall covering is 3/4" to at most 1" thick. If
the exterior wall covering is 3" thick then the Vertical
Blocking/Backing Lumber must be a minimum of 2 3/4" but no more than 3"
thick. The Vertical Blocking/Backing Lumber is fastened directly to the
wall and set with the top of the board a minimum of 5 1/2" above the
surface of the roof decking on Steep Sloped roof areas for most types of
roof Coverings; but a minimum of 6 1/2" for most Clay and Concrete Tile
Roof coverings and a minimum of 12" on all Low Sloped/Flat roof areas.
This top edge of the board is what the ledge of the Through the Wall (Z
Bar) Flashing sets on. The Underlayment and Roof Flashing is placed on
the outside of the Vertical Blocking/Backing Lumber and behind the
Through the Wall (Z bar) Flashing. The goal here is to move the Roof
Flashing out to the same plane as the exterior wall covering to better drain water off the roof and into the gutters
without having to use large Kickouts at the Eave to Gutter to Rake Wall
Intersections. (See our web page
Roof to
Wall Intersections for more information, photos, and drawings.)
- Though the Wall (Z Bar) Flashing: Install the new
Though the Wall (Z Bar) Flashing extending the upper portion of the
Though the Wall (Z Bar) Flashing up the wall a minimum of 3". The
Water-Resistive Barrier (House Wrap) and exterior wall covering is
placed over this upper portion of the Though the Wall (Z Bar) Flashing.
If there is no existing Water-Resistive Barrier (House Wrap) the upper
portion of the Though the Wall (Z Bar) Flashing is hand sealed to the
wall. The lower portion of the Though the Wall (Z Bar) Flashing is
extended down the face of the Vertical Blocking/Backing Lumber 3 1/2".
The Though the Wall (Z Bar) Flashing ledge where the exterior wall
covering intersects is normally slightly beveled for better water
drainage and less chance for the edge of the exterior wall covering to soak up any moisture.
The bottom edge of the Though the Wall (Z Bar) Flashing is made with a
1/2" flat hemmed kick.
- The Property Owner could Opt out of this Guideline and not use
the highly recommended Though the Wall (Z Bar) Flashing if not required
by their City/County Building Department as long as the installation of the
Primary Roof Flashing can be properly
installed. The proper installation of the Primary Roof Flashing
without installing the highly recommended Though the Wall (Z Bar)
Flashing would require: not damaging the existing exterior wall
covering; the Primary Roof Flashing must be installed so that it can be
easily adjusted with each course of the roof covering; the Primary Roof
Flashing must be properly installed not only behind the existing
exterior wall covering but behind the existing Water-Resistive Barrier (House
Wrap). The above criteria must be met so moisture will be able to drain down the Water-Resistive Barrier
(House Wrap) over the Primary Roof Flashing and back out onto the
surface of the roof covering as it would if the highly recommended
Though the Wall (Z Bar) Flashing were used.
- If the Though the Wall (Z Bar) Flashing has not been previously
installed: cut the existing exterior wall covering up
off the roof deck far enough to allow for the proper installation of the
new Through the Wall (Z Bar) Flashing to be installed up behind the
existing Water-Resistive Barrier (House Wrap), if there is any, without
damaging the existing Water-Resistive Barrier (House Wrap). Cuts
must be made straight.
- Roof Ventilation: Proper ventilation as required
by the 2012 IBC and IRC is required for
all roof installations for both new roof construction and when replacing an
existing roof covering. Some Asphalt Shingle Manufacturer's Warranties
could be voided if the underside of the roof decking is not properly vented. Check structure for Cathedral Ceilings.
Check for a minimum of 1" gap for air flow between the top of the insulation
and the underside of the roof decking. Soffit or Eave Vents may need to
be added in addition to Ridge Vents.
- "Provide net free ventilation area of not less than 1/300th of the
vented space where at least 40% and not more than 50% of the required
ventilating area is vented as Exhaust Vents in the upper portion of the
Attic or rafter space with the balance of the required ventilation of at
least 50% but no more than 60% is provided by eave or soffit vents as
intake Vents as is stated in the 2012 IBC and IRC.
- Material Defects: The Roofing Contractor is responsible for culling out all off grade and detectable defects in all roofing materials and accessories.
roofkey Roofing Guidelines for Asphalt Shingles
- Layers of Roofing: The maximum number of layers of roofing is one (1)
with Asphalt Shingles in Moderate or Severe Hail Prone Areas such as
Colorado. When one (1) or more layers of roofing exist, all layers of
roofing including the Underlayment must be removed prior to the installation of a new roof.
- Existing Decking: New decking overlay is
required for asphalt shingles if old existing decking is made of lumber
which is larger than 1" x 6" pieces of lumber or if the gaps between the
boards are more than 1/8".
- Minimum Slope: The minimum slope is 4:12 for standard
single ply underlayment installation. For slopes above 2:12 and less than
4:12 an underlayment of two (2) plies (lapped 19") of ASTM D 226 or D
4869 Type I or II underlayment (commonly referred to as15# or 30# base felt) or equal is required.
Other approved equal underlayments that are ASTM numbered may be used as
long as they are also applied in the same two ply fashion.
- Primary Step Flashing: Primary Step Flashing must be
properly laced with each and every course of shingles.
- Metal Drip Edge: A metal drip edge is required at both rake edges and
eaves with Asphalt Shingles.
- Number of Fasteners: A Minimum of six (6) fasteners are required for all
strip type shingles. (Some shingles require 8 nails for higher wind areas.
See manufacturer's specifications.)
- Location of Fasteners: Corrosion resistant fasteners shall be located
per manufacturer's instructions and not placed in factory applied adhesive.
Nails must also penetrate both parts of a laminated shingle. Check
manufacturer's specifications and association manuals for the correct
placement of nails across the length of the shingle.
- Over Driven Fasteners: Fasteners that have been over driven require
the sealing of the over driven fastener head and adding a new properly
placed and driven fastener.
- Mansard Roof Shingle Fastening: Mansard roof
applications also require the butts of all asphalt shingles to be hand
sealed down in addition to six nails for each shingle per the Asphalt Manufacturer's Association Manual.
Call for a roof inspection before shingles are fully and completely sealed
down.
This makes it easier to properly inspect the fasteners.
roofkey Roofing Guidelines for Cedar Shakes and Cedar Shingles
- Solid Decking: Is required for Cedar Shakes in Wind Driven Snow Areas.
- Minimum Slope: Minimum slope is 4:12 for cedar shakes and 3:12 for
cedar shingles with reduced coursing. For shake roof coverings over
non-living areas with slopes above 3:12 and less than 4:12, an underlayment
of an ice and water membrane is acceptable by many in the roofing industry
including us and some Building Departments for re-roofing only, but not new
construction.
- Underlayment/Interlayment: In addition to the
required single ply ASTM D 226 Type II underlayment (commonly referred to as
30# base felt) or equal, an 18" ASTM D 226 Type II interlayment
(commonly referred to as 18" 30# lace felt) is required to be laced in
between each course of shakes.
- Primary Step Flashing: Primary Step Flashing must be
properly laced with each and every course of Shakes or Shingles.
- Metal Drip Edge: A metal drip edge is required at both rake edges and
eaves with Cedar Shakes and Shingles.
- Shake Placement: Correct placement of the shakes or shingles is
critical. The maximum gap between the sides for each shake is 5/8". The
maximum gap between the sides for each shingle is 3/8"�. The sides of each
shake or shingles should never touch. The minimum side lap is 1 "�" between
joints in adjacent courses for all cedar shakes and shingles.
- Location of Fasteners: Corrosion resistant nails shall be placed to the manufacturer's specifications and industry standards, not too high or too low or too far from the sides of the cedar shake or shingle. See Cedar Shake & Shingle Bureau's www.cedarbureau.org specifications.
roofkey Roofing Guidelines for Clay and Concrete Tile
- Minimum Slope: Minimum slope is 3:12 for standard installation of most
concrete and clay tile. For slopes 2 �":12 to 3:12 an approved flat roofing
membrane is required. The tile and battens are then attached without
fasteners penetrating the flat roofing membrane. However, the minimum slope
is only 5:12 for some clay tile. Always, check with the manufacturer for
low-slope application specifications.
- Underlayment: An underlayment of two (2) plies
(lapped 19") of
ASTM D 226 Type II underlayment (commonly referred to as 30# base felt)is
required. Other ICC-ES approved "Alternate" Underlayments may be
used as long as they are also applied in the same two ply fashion. A single
ply of ASTM D 6380 or D 3909 Class M mineral surfaced rolled roofing
(commonly referred to as 90 pound granulated rolled roofing) may also be used as an
alternative underlayment. An Ice and Water Membrane that complies with
and is labeled ASTM D 1970 applied in single ply fashion may also be used as
the underlayment.
- Vertical Battens: Vertical battens or risers of a minimum 3/8"
thickness and made of cedar or decay resistant treated wood or other decay
resistant materials are required under the horizontal battens and over the
underlayment. (vertical battens are sometimes referred to as
wood lath which is generally 1 1/2" wide and 4' long) The spacing
depends on the size of the horizontal battens based on the total roof loads
for deflection. (See manufacturer's specifications.)
- Horizontal Battens: When using nominal dimensional lumber for
horizontal battens such as 1 x 2s, 1 x 4s, 1 x 6s, etc. the minimum
dimensions are �" x 1 �", �" x 3 �", �" x 5 �" respectively. It is ok to
use lumber that is slightly shy of the minimum dimensions as long as the
distance between the vertical battens is narrowed appropriately.
- Batten Fasteners: Corrosion resistant staples with 7/16" crown may be
used to fasten down the horizontal battens if the vertical battens or risers
are on a maximum of 12" centers. Greater spacing of the vertical battens or risers
requires 8d common corrosion resistant nails.
- Field Tile Fasteners: Corrosion resistant nails or screws with minimum
5/16" heads are required for fastening of filed tile.
Approved fasteners
shall penetrate through the horizontal battens but not penetrate the
underlayment. Approved corrosion resistant # 8 screws may be used as an
alternate.
- Field Tile Fastening: Each and every Field Tile is required to be
fastened down with one fastener if installing lugged tile and two fasteners
if installing a non-lugged tile.
- Hurricane Clips: Hurricane clips are required for each tile at all
eaves placed near their butts.
- Secondary Flashing: A secondary flashing is required
to be roofed into/over the underlayment at all Plumbing, Heat, and
Mechanical Vents, Rake Walls, Head Walls, Chimneys, Skylights, Swamp
Coolers, Curbs, and any Other Protrusion through the tile roof.
- Primary Flashing and/or Weather Blocking Material: A
primary flashing and/or in some cases other approved UV resistant and corrosion resistant
materials must be installed over the Field Tile to keep moisture on their
surface of the Field Tile as much as possible. This Primary Flashing and/or Weather Blocking
Material is required at all Plumbing, Heat,
Mechanical Vents, and along all Rake Walls, Head Walls, Chimneys, Skylights,
Swamp Coolers, Curbs, any Other Protrusion through the tile roof or objects
setting on the roof and under the Hip & Ridge Trim Tile but over the Field
Tile. This Primary Flashing and/or Weather Blocking Material must be
installed fully down on the surface of the Field Tile so that wind driven
snow or rain cannot get up under it and under the Field Tile.
- From the 1997 Concrete and Clay Tile Roof
Design Criteria Manual for Cold and Snow Regions: "Flashing for
tile roofs must do more then just keep water out of the building; it
must also keep water out from under the tile." "The tile surface
shall be flashed to prevent water from getting below the tile.
This is critical in snow areas since the tile can be lifted by the
collection of ice below the tile."
- From the 2010 Concrete and Clay Roof Tile Installation Manual for Moderate Climate Regions, "Openings at the Hips, Ridges, and Head Walls including Chimneys, Skylights, Solar Panels, and Down Slope Horizontal Abutments shall be fitted with weather blocking material to keep water on the surface of the Field Tile." "Step Flashing is typically used in areas where debris can accumulate".
- From the 1997 Concrete and Clay Tile Roof
Design Criteria Manual for Cold and Snow Regions: "Flashing for
tile roofs must do more then just keep water out of the building; it
must also keep water out from under the tile." "The tile surface
shall be flashed to prevent water from getting below the tile.
This is critical in snow areas since the tile can be lifted by the
collection of ice below the tile."
roofkey Roofing Guidelines General for all Flat Roofing Membranes
- Layers of Roofing: The removal of All existing Roof Coverings is
required where there exists (2) two or more layers of any type of Roof
Coverings. (1) One overlay over (1) one existing layer of an approved flat
roofing membrane is permitted provided the existing Roof Covering's surface
has been properly prepared to the manufacturer's specifications.
- Minimum Slope: New construction shall have a minimum
�" slope and
Positive Roof Drainage (no standing water after 48 hours). Re-roofing of an
existing structure must also have Positive Roof Drainage (no standing water
after 48 hours). Sometimes extra drains/scuppers and/or crickets will
need to be added.
- Drains / Scuppers: Secondary or overflow drains/scuppers are required
2" above the primary drains on all roofs having walls/parapet walls and shall discharge above grade and be
independent of primary drains/scuppers.
- Ballasted Roofs: Ballasted roofing membranes must follow the criteria set forth in the IBC and ANSI / SPRI RP-4 for the amount of ballast used in the field, at perimeters, and at corners, etc. depending on the height of the building and its parapet walls and if building is in an A, B, C Exposure. Depending on Exposure and Height of structure, a ballasted roof system may be prohibited. (See Section 1504.8 of the 2012 IBC.)
The roofkey Roofing Guidelines above may change in the future as Building Codes, Evaluation Service Reports, Manufacturer Specifications or Manuals evolve. Also, the above roofkey Roofing Guidelines may change if there is some other new roofing material and/or circumstance that occurs with roofing installations that we become aware of or an existing one rises to the degree of being a major problem.
End of roofkey Roofing Guidelines.
Revised - This Web Page Updated January 12, 2014