 |
 |
 |
 |
 |
 |
|
 |
 |
 |
 |
 |
||
Tile Eave To Rake Wall Installation
Below are step by step sketches and tips for the proper installation of Concrete Tile Roofing Materials and accessories at the Eave to Rake Wall/Side Wall Intersection using the proper Eave Flashing and Rake Wall/Side Wall Flashing. The sketches below are showing what happens after the underlayment and the eave and rake metal drip edge have been installed. The following web pages should be read and understood prior to reading this web page: Eave Framing/Trim Problems, Roof to Wall Intersections, Eave Roofing Material Installation, and Eave to Rake Wall Flashing.
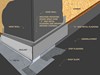
The above sketch is what the Eave to Rake Wall Intersection should look like before a Concrete Tile Roof is installed and after the Metal Drip Edge and Underlayment have been installed and the Trim has been properly completed including the Vertical Blocking/Backing Material and Through the Wall (Z Bar) Flashing.
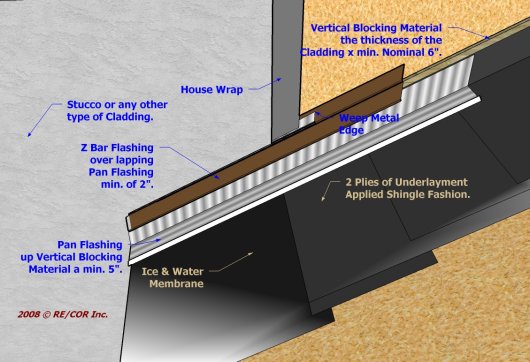
The Secondary Flashing at the Rake Wall for Tile Roofing is the (Pan) Flashing sometimes called "J" Metal.
The Secondary (Pan) Flashing:
-
Place the Secondary (Pan) Flashing up under the Through the Wall (Z Bar) Flashing extending it up the face of the Vertical Blocking/Backing Material a minimum of 5".
-
The Through the Wall (Z Bar) Flashing must overlap the top of the Secondary (Pan) Flashing a minimum of 2".
-
Extend the the end of the Secondary (Pan) Flashing 1" past the face of the Fascia Trim Board at the Eave.
-
Attach the Secondary (Pan) Flashing to the roof deck with clips or nails bent over the outside edge. Do not nail to the Vertical Blocking/Backing Material.
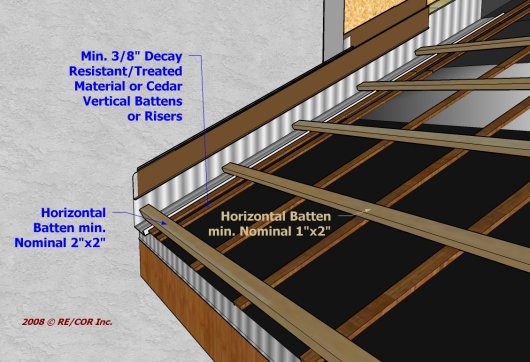
Vertical Battens or Risers minimum 3/8" thick of decay resistant material or cedar are placed over the underlayment.
Horizontal Battens do not need to be decay resistant since they do not set in water that sheds off the roof under the tile as the Vertical Battens do. The minimum size for the Horizontal Battens is Nominal 1" x 2". This minimum will increase in size depending on the City/County Criteria for Ground/Roof Top Snow Loads. If the Snow Load Criteria is 30 pounds or less most any type of wood of Nominal 1" x 2" can be used for most concrete tile weighing 10 or 11 pounds per square foot. Snow Loads that are greater will require larger dimensional lumber and may need to be of a certain species of stronger type lumber.
Do not install wood with rot, large knots, sap wood, bark, or wane. Also replace any that are broken or split. This inferior wood reduces the deflection resistance and causes breakage of the Tile. Plus it simply will not last as long as it should.
Vertical Battens:
- Place a Vertical Batten directly against the pan flashing edge to
prevent water from inadvertently running under the Pan Flashing. Even if
using Horizontal Battens with Risers attached this is a good idea.
- It is also a good idea to place the Vertical Battens across the roof on
12" centers as are all the alternative Batten Riser Systems. There will be
less breakage of Tile because there is less deflection in the Horizontal
Battens.
- However, The Vertical Battens are required to be on 12" centers if the
Horizontal Battens are less than Nominal 1" x 2" boards meaning less than
minimum 3/4" x 1 1/2".
- The Vertical Battens are also required to be on 12" centers if the
Horizontal Battens are stapled to the Vertical Battens or through the
risers. If the spacing between the Vertical Battens is greater than
12" the Horizontal Battens are required to be nailed with 8d common
corrosion resistant nails.
- Extend the Vertical Battens approximately 1/4" past the Eave Metal Drip
Edge for reasons that will become obvious below.
Horizontal Battens:
-
Place the Horizontal Battens over the Vertical Battens or Risers.
-
Horizontal Battens are fastened at each Vertical Batten or Riser. Make sure the fasteners are consistently placed into the Vertical Battens or Risers not to one side or the other.
-
The first Horizontal Batten is placed up from the eave a distance that will allow for the first course of Tile to extend past the Fascia about 1".
-
The rest of the Horizontal Battens are placed apart evenly up the roof slope in such a manner as to provide for a minimum of a 3" Head lap in each course of Tile.
-
The distance between the Horizontal Battens will be less if the Tile installation is staggered coursing instead of the standard straight coursing. The minimum head lap is still 3" and is measured from the butt of the staggered up Tile in one course to the top of the staggered down Tile in the course below.
For most Flat Profile Tile, if using Nominal 1" x 2" Horizontal Battens, install a Nominal 2" x 2" piece of lumber at the Eave within 1" of the edge for an Eave Riser. Using a Horizontal Batten that is the thickness of the Field Tile plus the thickness of the Field Horizontal Battens keeps the butts of the Tile in the first course on the same plane as the butts of the other Tile in the courses above. For High Profile Tile an additional or sometimes alternative Eave Riser may be required.
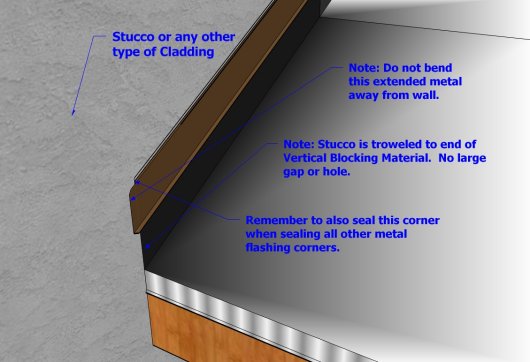
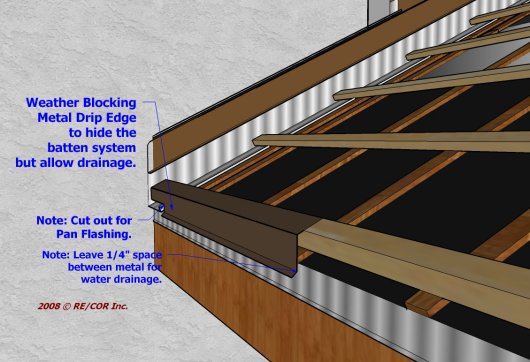
Next install a Weather Blocking Metal Drip Edge over the Eave Riser Board.
-
The Weather Blocking Metal Drip Edge serves both as a Weather Blocking Material and to cover the exposed Batten System.
-
Pre-painted metal will look better than galvanized.
-
The metal is bent at 120 degrees for roofs 4:12 to 8:12 and bent at a greater angle for steeper roofs.
-
The Weather Blocking Metal Drip Edge is placed and nailed to the top of the wood Eave Riser and extends down its face past the edge of the Eave.
-
A gap of about a 1/4" must be left between the back of the Weather Blocking Metal Drip Edge and the face of the Eave Metal Drip Edge so that water and debris can flow out from under the Tile unimpeded. Tip: Extending the ends of the Vertical Battens to or slightly past the edge of the Eave will provide for the gap required to allow water to easily flow and debris to fall out from under the Tile roof.
-
The Weather Blocking Metal Drip Edge is cut out to fit over the edge of the Secondary Pan Flashing for better water drainage.
The Tile roof can then be installed. Most Colorado City and/or County Building Departments recognize that they are in high wind areas (100 mph 3-second wind gusts) and in snow load areas of 40 lbs. per square foot or more which then require the following for the attachment of Tile Roof Coverings:
-
Fasten each and every field Tile in each and every course with two fasteners per Tile.
-
Hurricane Clip the butts of each field tile in the first course. Wherever possible, attach the Hurricane Clips to the top of the Eave Riser Board. An option is to add a second Nominal 1" x 2" Horizontal Batten behind the Eave Riser Board for the Hurricane Clips to be attached. Either way the fasteners do not penetrate the underlayment.
-
The nails to attach the Tile must be long enough to penetrate the Horizontal Battens a minimum of 3/4" or through the Batten whichever is less but not penetrate or touch the Underlayment. The reason why the Vertical Battens or Risers must be minimum 3/8" thick is to assure that a nail penetrating 1/8" through the Horizontal Batten does not also penetrate the Underlayment even with some deflection.
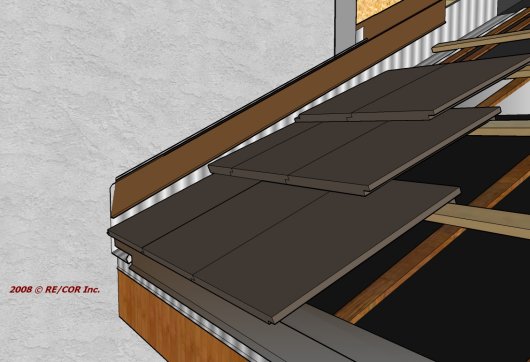
The Tile installation sketch above looks complete. Doesn't it?
No, it really is not completed at the Rake Wall.
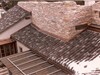
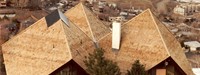
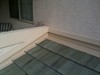
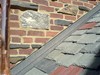
Most Rake Walls, Skylights, and Chimneys look like this (see photos below) after just a few years, completely clogged with debris because there is rarely any Weather Blocking Material installed.


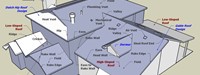
The 2006, 2010, and 2015 Concrete and Clay Roof Tile Installation Manual for Moderate Climate Regions clearly states "Typically used in areas where debris can accumulate" referring to the illustration for the use of step flashing. It also states "Openings at hips, ridges and head walls including chimneys, skylights, solar panels, and down slope horizontal abutments shall be fitted with weather blocking material to keep water on the surface of the field tile."
It is even more clearly stated in the 1997 Concrete and Clay Tile Roof Design Criteria Manual for Cold and Snow Regions "Flashing for tile roofs must do more than just keep water out of the building; it must also keep water out from under the tile....Along walls, a water proofing membrane shall be used from the deck up the walls 6 inches. The tile surface shall be flashed to prevent water from getting below the tile. This is critical in snow areas since the tile can be lifted by the collection of ice below the tile."
More than enough rain and snow, debris and critters get in under a Tile roof through the field. Why make it even easier at rake walls when every other roof area opening requires a Primary Flashing of some type to keep water on the surface of the tile. For that matter, for all other roofing materials, the roof flashing at Rake Walls is installed to keep water on the surface of the field roofing material. Tile is no different. The Primary flashing is the (Step) Flashing and is the best way to keep as much of the water on the surface of the Tile while stopping most debris and critters from gaining an entrance.
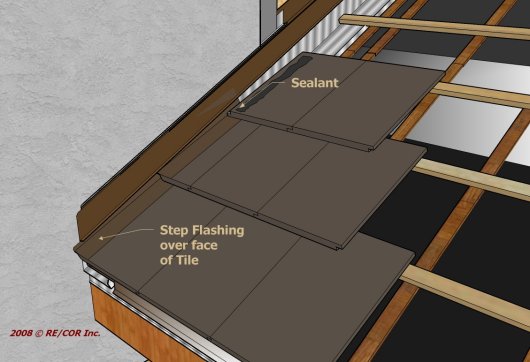
Install (Step) Flashing to serve as the Primary Flashing to keep as much water as possible on the surface of the Field Tile. For profile tile a malleable metal must be used to form to the curvature of the tile.
Primary (Step) Flashing:
-
The Primary (Step) Flashing is extended up under the Through the Wall (Z Bar) Flashing a minimum of 2".
-
Place the lower edge of the Primary (Step) Flashing even with the butt of the tile in each and every course along a Rake Wall.
-
Each piece of Primary (Step) Flashing is extended up under the butt of the Tile in the course above a minimum of 3".
-
As long as there is a Secondary (Pan) Flashing at the Rake Walls, the Primary (Step) Flashing only needs to extend out from the Rake Wall over the Field Tile's surface a few inches; enough so that a proper bond can be made between the Primary (Step) Flashing and the surface of the Field Tile.
-
Each Primary (Step) Flashing is secured in place using an appropriate weather proof bonding agent that will adhere metal to the Tile's surface.
-
Pre-painted metal looks far better than galvanized.
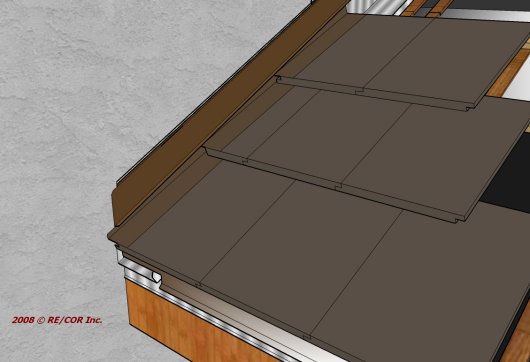
Now this Tile Eave to Rake Wall Installation is correctly completed. It not only looks very good but looks finished. No gaps or unfinished edges, and it will stay looking that way for years with superior performance compared to the Tile installations without Primary (Step) Flashing, Through the Wall (Z Bar) Flashing, and Eave Weather Blocking Metal Edge.
Visit our
Roof Inspection Services
web page
and the many other web
pages throughout this website to find
answers to your roofing questions and
solutions to your roofing problems.
Page Revised/Updated 2/27/2023