 |
 |
 |
 |
 |
 |
|
 |
 |
 |
 |
 |
||
Roof to Wall Flashing
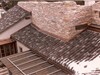
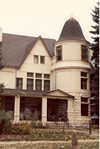
There have always been problems with roof to wall flashing details at Head Walls, Rake (Side) Walls, and Chimneys where the Roof Coverings intersect with the Exterior Wall Covering - especially if stucco, brick, or stone veneer are used.
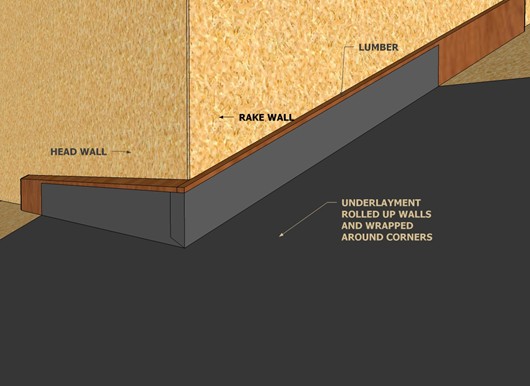
All exterior wall coverings, whether it is wood siding, vinyl siding, brick or stone veneer, stucco, etc. must be kept up off the surface of the roof a minimum 1 ½"; some manufacturers of exterior wall coverings require a minimum of 2". (See http://www.jameshardie.com/d2w/best-practices/quick-start-hz5-us-en.pdf) This reduces the chance for water on the roof's surface to be soaked up the wall prematurely, deteriorating the exterior wall covering material. All roof flashings must move freely behind the exterior wall covering no matter what the exterior wall covering is made of and should never be fastened to any wall.
The contractors usually try to slide the roof flashing up behind lapped siding but many times this can be a chore and sometimes the exterior wall covering and/or the existing Water-Resistive Barrier (House Wrap) gets damaged in the process. This then requires the exterior wall covering and/or the existing Water-Resistive Barrier (House Wrap) to be removed so that repairs can be made. This becomes a real problem if the lapped siding has now been covered with another exterior wall covering such as vinyl siding or stucco.
Stucco, brick, or stone exterior wall coverings are a problem especially at rake walls where the Roof to Wall Flashing is generally fastened to the walls prior to the roof being installed so that the stucco, brick, or stone walls can be finished first. It is always a good idea to have the exterior wall covering (Siding) installed before the roof covering is installed. However, if not done correctly, this does not allow the free movement needed for the roof flashing to be adjusted to the weather exposure of the roofing material. Also, when the mortar of the brick or stone veneer is not up off the roof deck as it should be, it will rapidly deteriorate from soaking up the water off the roof and from freeze thaw cycles we see here in Colorado. What happens years down the road when the property owner changes the type of roofing material or the flashing has deteriorated?
Most of the time it is impossible to properly install the New Underlayment or the New Roof to Wall Flashing up the walls as required by Building Codes and Manufacturers' Installation Specifications/Instructions without removing some of the existing stucco, brick or stone veneer at or near the roof line. It is no longer acceptable to install the new roof flashing on the outside of the stucco, brick or stone veneer and then install flush mount or sawn in counter flashing. This is no longer a good idea because the moisture that gets in behind all exterior wall coverings including stucco, brick or stone cannot exit back onto the roof's surface as is required by Building Codes and Manufacturers' Installation Specifications/Instructions.
Solution
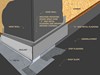
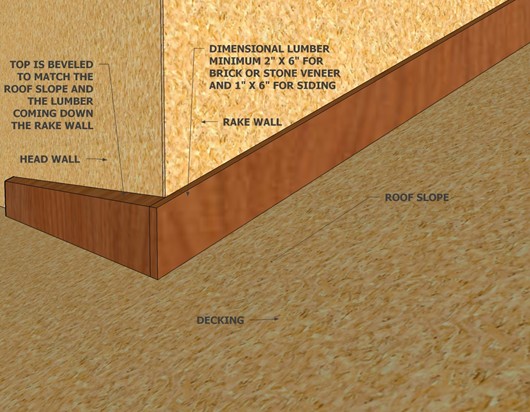
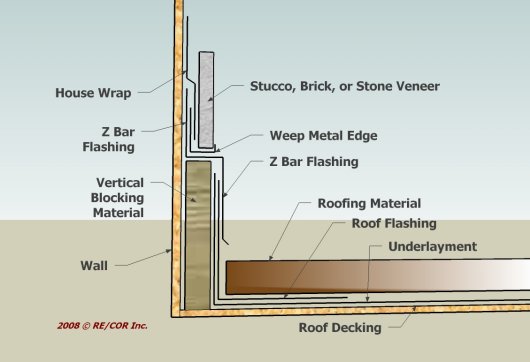
The solution to the problem above is to properly flash walls and chimneys using Vertical Blocking/Backing Lumber and Through the Wall (Z Bar) Flashing. This solution keeps the exterior wall covering, no matter what it is made of, and the roof covering material separated. The goal here is to move the Roof to Wall Flashing out to the same plane as the Exterior Wall Covering to better drain water off the roof and into the gutters without having to use a large Kick-out Flashing at the Eave and Gutter to Rake Wall Intersections as well as making it far easier to replace the roof covering or the exterior wall covering independently of each other in the future.
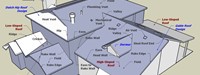
Below are step-by-step detailed sketches showing how to properly flash walls and chimneys. The Rocky Mountain Masonry Institute has reviewed the final drawing in the following sequence of drawings and has indicated its approval through an e-mail to me. The following flashing detail is good for any type of exterior wall covering including stucco, brick or stone veneer, wood, or vinyl siding. The thickness of the vertical blocking material will vary to match the thickness of the exterior wall covering. You will also see similar drawings throughout almost all installation manuals for various roofing materials. Why this detail is ignored I do not know.
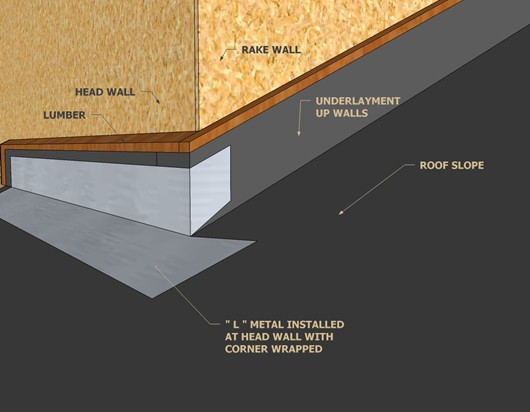
The minimum size of the Vertical Blocking/Backing Lumber is 3/4" x 5 ½", the actual measurements of a standard nominal 1" x 6" piece of lumber. The thickness must be varied depending on the thickness of the exterior wall covering being used (i.e. brick or stone) used on the walls and in height depending on the thickness of the roofing material. The Through the Wall (Z Bar) Flashing is extended up the wall a minimum of 3" and covered with a Water-Resistive Barrier (House Wrap) material. The Through the Wall (Z Bar) Flashing is sized to the thickness of the Vertical Blocking/Backing Lumber. It is extended down the face of the Vertical Blocking/Backing Lumber and over the "L" Metal at Head Walls and the Step Flashing at Rake (Side) Walls a minimum of 3 ½".
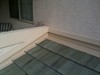
Where a rake wall extends to an eave a very small kick-out of the metal wall flashing can now be used since the wall flashing is on the outside of a Vertical Blocking/Backing Lumber of the same thickness as the exterior wall covering and is properly covered with the Through the Wall (Z Bar) Flashing. See our web pages Eave to Rake Wall Flashing and Tile Eave to Rake Wall Installation.

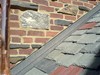
Remember never separate the "L" Metal and the 1st piece of Step Flashing
with any roofing material.
Think of them as one continuous piece of metal.


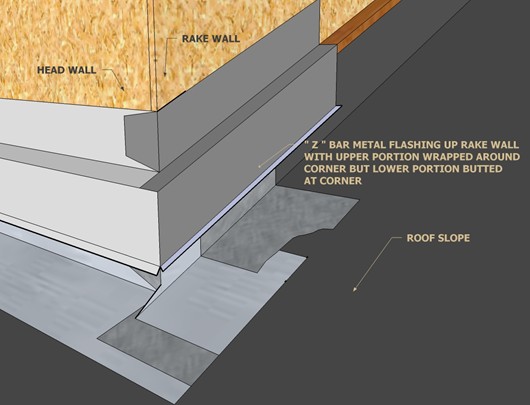
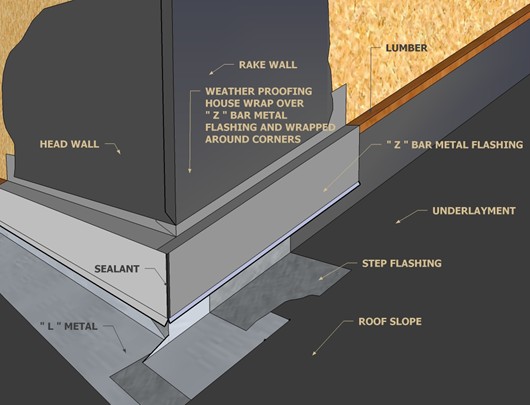
Remember to hand seal all corners.
Visit our
Roof Inspection Services
web page
and the many other web
pages throughout this website to find
answers to your roofing questions and
solutions to your roofing problems.
Page Revised/Updated 2/27/2023